
Seven practices reliably prevent furniture loss, speed reassembly, and protect your budget during an office move or reorganization: start your inventory 90 days out, assign unique asset IDs to every unit, photograph each item before packing, capture condition and ownership fields, treat the move itself as a scannable event with control points, assign a named owner to each task, and reconcile the register within 14 days of move-in. Your immediate next step: block two hours this week to walk one floor, count every piece of furniture, and open a shared spreadsheet with the fields listed below.
Quick-reference checklist:
- Start the inventory at least 90 days before move day
- Assign a unique asset ID to every chair, desk, and storage unit
- Photograph every item before packing (front and any damage)
- Record condition, location, assigned user, and serial number
- Scan items at load, receipt, and final placement
- Name one person responsible for each inventory phase
- Reconcile the register within 14 days post-move
Pro Tip: If you only do one thing today, tag a single pilot zone (one conference room or one row of workstations) and run the full process on it. You will find every gap in your workflow before move day.
Key Takeaways
A complete, tagged, photo-documented asset register started 90 days before move day is the single most reliable way to prevent furniture loss, reduce costs, and close reconciliation within two weeks of move-in.
| Point | Details |
|---|---|
| Start 90 days out | Begin tagging and auditing at least 90 days before move day to give procurement and surplus teams time to act. |
| Tag every unit individually | Assign a unique asset ID to each piece of furniture; tracking by line item rather than unit is the most common inventory failure. |
| Scan at every control point | Scan items at load, receipt, and final placement to create a timestamped chain of custody that resolves disputes fast. |
| Reconcile within 14 days | Close the register to physical assets within 14 days of move-in; after that, data drift makes reconciliation significantly harder. |
| Movecraftmoving for complex moves | For multi-floor or high-asset-count relocations, Movecraftmoving provides vetted carrier coordination and move-day controls that protect your inventory. |
Table of Contents
- 1. When should you start the inventory before a move?
- 2. How do you organize the inventory: scope, naming, and required fields?
- 3. Which tracking tools and methods actually save time?
- 4. How should you label furniture for transport and reassembly?
- 5. Who owns each task? Roles and vendor briefing
- 6. How do you assess condition and decide what to do with each item?
- 7. Step-by-step operational process from packing to reassembly
- 8. Post-move reconciliation: closing the loop on discrepancies
- 9. How do you keep the inventory accurate after the move?
- 10. Move Craft’s recommended inventory workflow
- What most teams get wrong about office furniture inventory
- Movecraftmoving coordinates the inventory-heavy moves most teams underestimate
- Sources
1. When should you start the inventory before a move?
The answer is earlier than you think: start the tagging and reconciliation process well in advance before move day to allow procurement, surplus, and accounting teams adequate time to act. That window gives procurement, surplus, and lease or accounting teams enough time to act on what the inventory reveals. Furniture you discover is end-of-life at 90 days can be donated or recycled before the move. Discovered at 30 days, it becomes a last-minute disposal problem that costs money and time.
Milestone timeline:
- 90 days out: Kick off the inventory. Assign roles, open the asset register, and begin room-by-room tagging.
- 60 days out: Complete the first full draft of the register. Flag items for reuse, repair, storage, or disposal. Brief procurement on what not to buy.
- 30 days out: Finish the tagging phase. Confirm destination room assignments. Run a pre-packing audit to catch gaps.
- 7 days out: Print and attach destination labels. Brief movers on tag conventions and handling notes.
- Move day: Activate scan-on-load controls. Assign a team member to each loading zone.
- 0–14 days post-move: Reconcile the register to physical assets. Document discrepancies and file any damage claims.
For a single-floor move, the tagging phase typically takes one to two days with two people. A multi-floor move needs a week or more. A multi-site relocation should budget two to three weeks for the initial audit alone, with a dedicated coordinator per site. Keeping staff productive through that window is its own discipline; a practical productivity plan helps you schedule inventory work around business operations rather than against them.
2. How do you organize the inventory: scope, naming, and required fields?
The most common mistake in office furniture management is tracking furniture as line items on a purchase order rather than as individual physical units. A PO for “12 task chairs” tells you nothing about which chair is in which room, what condition it is in, or who is responsible for it. MIT’s institutional guidance recommends mapping existing stock with a digital inventory before buying new, and that principle holds for any move or reorganization.
Minimum required fields for every asset record:
- Unique asset ID (your own convention, not the vendor’s)
- Category (desk, chair, storage, AV, etc.)
- Description (manufacturer, model, color, size)
- Building / floor / room / zone (current location)
- Condition (New, Good, Repairable, End-of-life)
- Acquisition date and cost (if known)
- Ownership status (owned, leased, loaned)
- Serial number and model number
- Assigned user or department
- Photo filename or link
- Destination room (for moves)
ID convention that survives moves: Build asset IDs from a fixed prefix plus a sequential number: FRN-00142. Never encode the room number into the ID itself. If you write 3B-DESK-001, the ID breaks the moment the desk moves to floor 4. The room lives in the location field, not the ID.
Sample inventory template:
| Field | Example | Notes |
|---|---|---|
| Asset ID | FRN-00142 | Fixed prefix, sequential number |
| Category | Task chair | Use a controlled list of categories |
| Description | Herman Miller Aeron, black, size B | Manufacturer + model + color + size |
| Current location | Floor 3, Room —, Zone A | Update at every move event |
| Condition | Good | New / Good / Repairable / End-of-life |
| Acquisition date | March | Leave blank if unknown |
| Ownership | Owned | Owned / Leased / Loaned |
| Serial number | HM- — | From label on underside of seat |
| Assigned user | Marketing dept. | Or named individual |
| Photo | FRN-00142-front.jpg | Required before packing |
| Destination | Floor 5, Room — | Populated at 30-day milestone |
3. Which tracking tools and methods actually save time?
Workplace asset management data shows that many organizations’ inventories are off by 20–40%, and spreadsheets tend to break down after roughly 500 assets or three locations. That is not an argument against spreadsheets for small moves. It is an argument for knowing when to graduate to something more capable.
Barcode/QR vs. RFID: a practical comparison
| Factor | Barcode / QR | RFID |
|---|---|---|
| Unit cost per tag | Under $0.10 | $0.25–$1.50+ |
| Reader hardware | Smartphone camera | Dedicated RFID reader |
| Line-of-sight required | Yes | No |
| Best for | Moves, audits, small-medium offices | Large warehouses, high-velocity environments |
| Setup effort | Low | Medium to high |
| Integration options | Most asset apps | Specialized platforms |

For most office moves, QR codes printed on durable polyester labels and scanned with a smartphone hit the right balance of cost and speed. RFID makes sense when you are managing thousands of assets across a warehouse or multi-building campus and need hands-free scanning at dock doors.
Software tiers to consider:
- Lightweight (under 500 assets): A shared Google Sheet or Airtable base with a QR-code generator like QR Code Generator or Canva. Free to low cost, easy to share, but requires manual discipline.
- Mid-tier (500–2,000 assets): Asset management tools like Asset Panda or Snipe-IT offer mobile scanning, move workflows, and photo attachment without enterprise pricing.
- Enterprise (2,000+ assets or multi-site): Platforms with CMMS integration, HRIS linkage, and approval workflows. Connecting asset IDs across enterprise systems eliminates manual reconciliation when a desk changes departments.
Pro Tip: Before rolling out tags across the whole office, run a one-week pilot on a single conference room. Scan every item in, simulate a move to a different room, and scan it back. You will surface every workflow gap before it becomes a move-day problem.
- Integrate asset IDs with your procurement system so every new purchase automatically creates a register entry
- Use mobile scanning for rotating audits, not just moves; a quarterly walk-through with a phone takes minutes per room
- Furniture tracking guidance recommends tracking by unit, not line item, and creating a surplus location to prevent duplicate purchasing
4. How should you label furniture for transport and reassembly?
A label that falls off during transit is worse than no label. The asset tag (the permanent barcode or QR code) stays on the item forever. The move label is a second, temporary label that tells movers where the item is going and how to handle it.
What every move label must include:
- Asset ID (matches the register)
- Destination room number and floor
- Department or contact name
- Fragile or special handling flag (if applicable)
- Color-coded dot or stripe for zone/team
Placement by furniture type:
- Desks: Underside of the work surface, away from the edge. Avoid the front modesty panel (first thing to get scraped).
- Task chairs: Underside of the seat pan. Never on the armrest or base.
- Filing cabinets and storage: Inside the top drawer on the front face. The exterior gets bumped.
- Modular/panel systems: On the back of each panel section, upper corner. Mark disassembly sequence with a number.
- Conference tables: Underside near the center support. Note the number of pieces if it disassembles.
Color-coding works best when it maps to one clear dimension. Pick one: team or department (Marketing = blue, Finance = green), reassembly sequence (1 = first room to set up, 2 = second), or disposition category (move = green, storage = yellow, donate = red). Mixing dimensions on the same color system creates confusion on move day. Labeling best practices that apply to boxes translate directly to furniture: consistent placement, readable font, and a system everyone on the crew understands before the first truck is loaded.
5. Who owns each task? Roles and vendor briefing
Inventory work fails when everyone assumes someone else is doing it. A clear roles matrix, written down before the 90-day kickoff, prevents that.
Roles matrix:
| Role | Responsibility | Phase |
|---|---|---|
| Inventory coordinator | Owns the register, assigns IDs, resolves discrepancies | All phases |
| Zone leads (1 per floor) | Physical tagging, condition assessment, photo capture | 90–30 days |
| Department heads | Sign off on condition ratings, confirm user assignments | 60–30 days |
| Facilities manager | Approves disposition decisions, coordinates surplus | 60 days out |
| Move-day supervisor | Manages scan-on-load, briefs movers, handles exceptions | Move day |
| Finance contact | Receives depreciation updates, reviews leased asset list | Post-move |
Move-day communication template:
- Pre-move check-in (day before): Confirm all items are tagged, destination labels are attached, and the register is locked for edits.
- Live status (move day): Zone leads report scan counts every two hours. Flag missing items immediately, not at end of day.
- Post-move confirmation (within 48 hours): Zone leads confirm all items are placed and scanned-in. Discrepancy list goes to the inventory coordinator.
For vendor briefing, show movers physical examples of your asset tags and destination labels before the first box is touched. Provide a printed handling-notes sheet for fragile or high-value items. Require signed move manifests at load and at receipt. A commercial move vendor coordination checklist covers the documentation and briefing steps in detail. For coordinating employees through the process, a separate communication plan keeps staff informed without pulling them into logistics they do not need to manage.
6. How do you assess condition and decide what to do with each item?
The default in most office moves is to move everything and figure it out later. That default is expensive. Research shows that facilities managers spend roughly a fifth of their furniture budget storing items that could be reused, and reuse programs have generated six-figure savings and measurable CO₂e avoidance in documented cases.
Condition rubric:
- New: Unused or like-new. Move and deploy.
- Good: Normal wear, fully functional. Move and deploy.
- Repairable: Damaged but fixable (torn upholstery, broken caster, loose joint). Repair before or after move; flag for work order.
- End-of-life: Structurally compromised, obsolete, or beyond economic repair. Do not move; disposition immediately.
Disposition hierarchy (in order of preference):
- Reuse internally in the new space
- Reconfigure or repair for a different internal use
- Donate to a nonprofit or school (get a receipt for tax purposes)
- Resell through a used-office-furniture dealer or online marketplace
- Recycle through a certified e-waste or furniture recycler
- Dispose as a last resort
For leased assets, check the lease agreement before any disposition decision. Many leases require return in original condition or carry buyout clauses. Moving a leased item without notifying the lessor can trigger a penalty. Flag every leased asset in the register with its lease-end date and return terms. Storage solutions during relocation can bridge the gap when items need to leave the old space before the new space is ready to receive them.
7. Step-by-step operational process from packing to reassembly
Treating the move as a series of scannable state transitions, rather than a single chaotic event, is what separates a recoverable move from a disaster. Each scan creates a timestamped record that answers “where was this item, and who confirmed it?”
Phase 1: Pre-packing (7–1 days out)
- Confirm every item has an asset tag and a destination label.
- Photograph each item (front view, plus any existing damage).
- Record serial numbers for high-value and IT-adjacent items.
- Create a packing manifest: a list of every item leaving each room, with asset IDs.
- Lock the register against new entries; changes require coordinator approval.
Phase 2: Packing and loading
- Scan each item at the point of loading (scan-on-load).
- Record the container or pallet number it goes into.
- Update the register status to “In transit.”
- Zone lead signs the load manifest for each truck or container.
Phase 3: Transport and reception
- Scan each item on arrival at the new location (scan-on-receipt).
- Inspect against the pre-move photo. Note any new damage immediately.
- Mark damaged items with a red tag and photograph the damage.
- Decide: immediate repair (minor) or deferred work order (major). Log the decision.
Phase 4: Reassembly and placement
- Scan each item when placed in its destination room (scan-on-place).
- Verify the assigned user or department matches the register.
- Close the move event in the register; update location to the new room.
- Zone lead signs off on room completion.
Exception handling:
- Missing item: Check the packing manifest and truck manifests first. If not located within 24 hours, escalate to the move-day supervisor and open a missing-item report.
- Damaged item: Photograph, tag, and log before moving it again. Do not repair before documenting.
- Contested ownership: Freeze the item in place and escalate to the inventory coordinator. Do not assign it to a new user until the dispute is resolved.
For IT equipment and AV racks, the same scan-point logic applies, but those items need specialist handling and their own chain-of-custody documentation separate from general furniture.
8. Post-move reconciliation: closing the loop on discrepancies
Reconciliation is not optional. A register that does not match physical reality is worse than no register, because it gives false confidence. Complete the reconciliation within 14 days of move-in, while memories and photos are fresh.
Reconciliation checklist:
- Confirm physical presence of every item in the register (walk the new space)
- Verify each item is in the correct room per the destination field
- Confirm condition matches the post-move assessment
- Confirm assigned user or department is correct
- Flag any item present but not in the register (untagged items found during the walk)
- Flag any item in the register but not found physically (missing items)
Documentation for claims and insurance:
- Pre-move photo (timestamped)
- Post-move damage photo (timestamped)
- Signed move manifest showing the item was loaded and received
- Written damage report filed within the carrier’s claim window (check your contract; many carriers require notice within 48–72 hours)
Photo evidence before and after dramatically reduces disputed damage claims and speeds insurance or warranty follow-up. Without a pre-move photo, you cannot prove the damage happened during transit rather than before.
Update workflow after reconciliation:
- Inventory coordinator updates the master register with final locations and condition ratings.
- Finance receives a list of any items that changed condition category (affects depreciation) and any leased items that were disposed of.
- Target SLA for register updates: within 14 days of move-in. After that, the data starts drifting.
9. How do you keep the inventory accurate after the move?
A one-time inventory for a move is useful. A living register that stays accurate between moves is what actually reduces costs over time. Lifecycle planning guidance recommends tracking installation dates, maintenance records, warranty details, and replacement timelines to avoid emergency replacements and budget surprises.
Audit schedule:
- Quarterly rotating audits: Walk one zone or floor per quarter. Scan every item, compare to the register, and update discrepancies. A quarterly rotation means every item gets audited at least once a year without requiring a full shutdown.
- Annual full review: Walk the entire inventory once a year. Reconcile to finance records. Update lifecycle fields (age, condition, warranty status).
Lifecycle triggers to track in the register:
- Warranty expiration date (triggers a maintenance check before it lapses)
- Scheduled maintenance date (chairs, height-adjustable desks, and AV equipment all have service intervals)
- Replacement threshold (e.g., any item rated Repairable for two consecutive audits moves to End-of-life)
Recommended KPIs:
| KPI | What it measures | Target |
|---|---|---|
| Inventory accuracy rate | % of physical items matching the register | over 90% |
| Items reused vs. procured | Ratio of reused to newly purchased items | Track trend over time |
| Time-to-reconcile | Days from move-in to register update | 14 days or fewer |
| Surplus utilization rate | % of surplus items reused or donated vs. disposed | Maximize reuse |
Feeding new purchases directly from procurement into the asset register, rather than entering them manually after the fact, is the single most reliable way to keep the register accurate. When a purchase order creates an asset record automatically, the register grows with the office rather than falling behind it.
10. Move Craft’s recommended inventory workflow
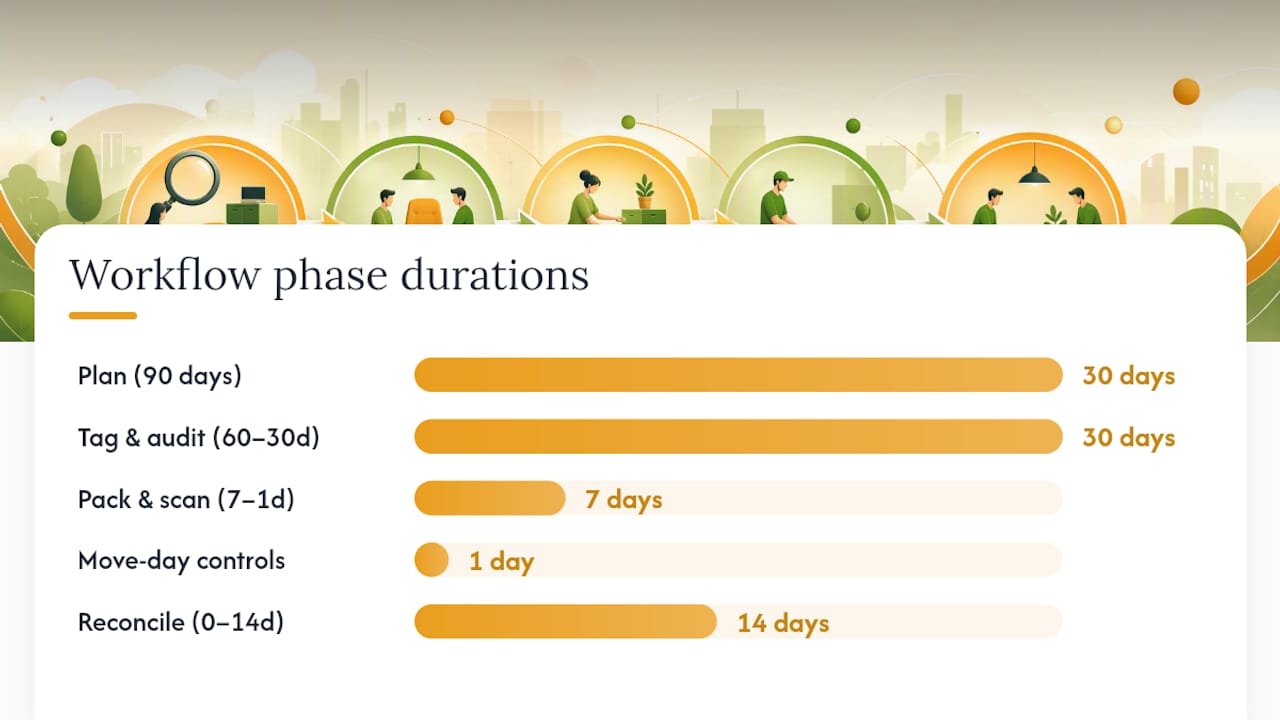
The workflow below is the one Movecraftmoving recommends to commercial clients coordinating inventory-heavy relocations. It is built around five phases with clear handoffs, so any team member can pick up where another left off.
The Move Craft five-phase workflow:
- Plan (90 days out): Open the asset register, assign zone leads, define the ID convention, and set the disposition hierarchy. Brief procurement on the freeze: no new furniture purchases until the inventory is complete.
- Tag and audit (60–30 days out): Zone leads tag every item, capture photos, and record condition. Facilities manager reviews and approves disposition decisions. Surplus items leave the register and enter the surplus channel.
- Pack and scan (7–1 days out): Attach destination labels, create packing manifests, and brief movers. Confirm scan-on-load protocols with the moving crew.
- Move-day controls: Activate scan points at load and receipt. Zone leads report status every two hours. Exceptions go to the move-day supervisor immediately.
- Reconcile (0–14 days post-move): Walk the new space, reconcile the register, file damage claims, and update finance.
Priority item callouts: AV equipment, IT racks, height-adjustable desks, and executive furniture all need individual chain-of-custody records and specialist handling. For data center and IT rack moves, the documentation requirements go beyond standard furniture manifests.
Vendor-vetting quick checklist:
- Proof of liability insurance and cargo coverage
- References from at least two comparable commercial moves
- Written handling protocols for fragile and high-value items
- Willingness to sign move manifests at load and receipt
- Clear escalation contact for move-day exceptions
Pro Tip: Ask your moving vendor to walk the space with you before move day. A vendor who has seen the freight elevator, the loading dock, and the tight corridor on floor 3 will plan the crew and equipment correctly. One who has not will improvise, and improvisation on move day is expensive.
What most teams get wrong about office furniture inventory
The conventional wisdom says the inventory is the boring part of a move. Get it done fast, move on to the floor plan. That framing is exactly why so many moves end with missing chairs, duplicate purchases, and a register nobody trusts.
The real problem is not that teams skip the inventory. It is that they treat furniture as a category rather than as individual assets. When a desk is “one of 40 desks,” nobody owns it. When it is FRN-00142, assigned to the marketing department, rated Good, and photographed on March 3, somebody owns it and can be held accountable for it.
The common failure pattern: a team starts tagging two weeks before move day, runs out of time, and moves the last third of the office untagged. Those untagged items are the ones that go missing, get damaged without documentation, or end up in the wrong room with no record of where they came from. Starting at 90 days is not bureaucratic padding. It is the only way to finish.
Movecraftmoving coordinates the inventory-heavy moves most teams underestimate
Commercial moves with 200 or more furniture assets, multiple floors, or tight timelines are where in-house coordination most often breaks down. Movecraftmoving connects you with vetted carriers and logistics professionals who have handled exactly these moves, with the documentation standards and move-day controls this guide describes.

The difference between a managed commercial relocation and a self-coordinated one is not the checklist. It is having a coordinator who has run the process before, knows which vendors sign move manifests without being asked, and can resolve a missing-item exception at 2 PM on move day without pulling the facilities manager off the floor. For moves above a certain size or complexity, that coordination pays for itself in avoided losses and faster reconciliation.
If your move involves multiple floors, leased assets, or a hard deadline, get a relocation plan started with Movecraftmoving before your 90-day window closes.
Sources
- Creating an Inventory of Office Equipment and Furniture Used for Remote Work
- Workplace Asset Management: Tracking Furniture, Tech, and Equipment 2026 Guide
- Opinion: How a furniture asset management strategy could cut costs and boost sustainability | Facilitate Magazine
- Furniture tracking for busy offices: stop losing chairs (and money)
- Real Cost of Office Furniture: A Lifecycle Planning Guide
Recommended
- Long Distance Moving Inventory Checklist: 2026 Guide – Move Craft Moving Solutions LLC
- How to Coordinate Employees During an Office Move – Move Craft Moving Solutions LLC
- Minimize Productivity Loss During Relocation: A Practical Plan – Move Craft Moving Solutions LLC
- Commercial Move Vendor Coordination Checklist for 2026 – Move Craft Moving Solutions LLC